PRESS ON NAILS sizE guide & tutorials
Don’t know your nail size?
Materials needed:
Piece of paper/ clear tape OR soft measuring tape(mm)/ permanent marker/ a ruler in millimeters(mm) if using clear tape method.
Firstly…
On a piece of paper make a section called LEFT HAND & one called RIGHT HAND. Going down the middle of your paper, write T for thumb, I for index, M for middle, R for ring, and P for pinky.
Clear tape method:
1) Take a piece of clear tape & lay it across your BARE nail. Make sure to tuck the tape into the sides of your nail.
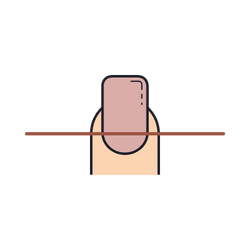
2)Taking the thin tip marker you’re going to measure the width of your nails horizontally, marking on the tape where your nail starts to curve upward(see photo below). Make sure to tuck the tape into the sides of your nail.
Measuring Reference
3) Take off the piece of tape, and place it on your paper. Taking your ruler, measure the space between the lines. Using this measurement, you can match it to its press on nail size.
Soft measuring tape method:
Using soft measuring tape, measure the width of your nails horizontally at their widest point(near cuticle area), in “mm”. Be sure to get deep into the sides of your nail.
important: measure all 10 nails as sizes may differ from your left hand to your right hand!!!
check out my video tutorial!


press on size guide tips
1cm=10mm
You might find it easier to use clear tape
If you are in between sizes, sizing up is better than sizing down…in my opinion. You can always gently file down the sides of your press ons if they are slightly bigger.
please note: you are responsible for making sure your nails are measured correctly. there will be no refunds for incorrect orders.
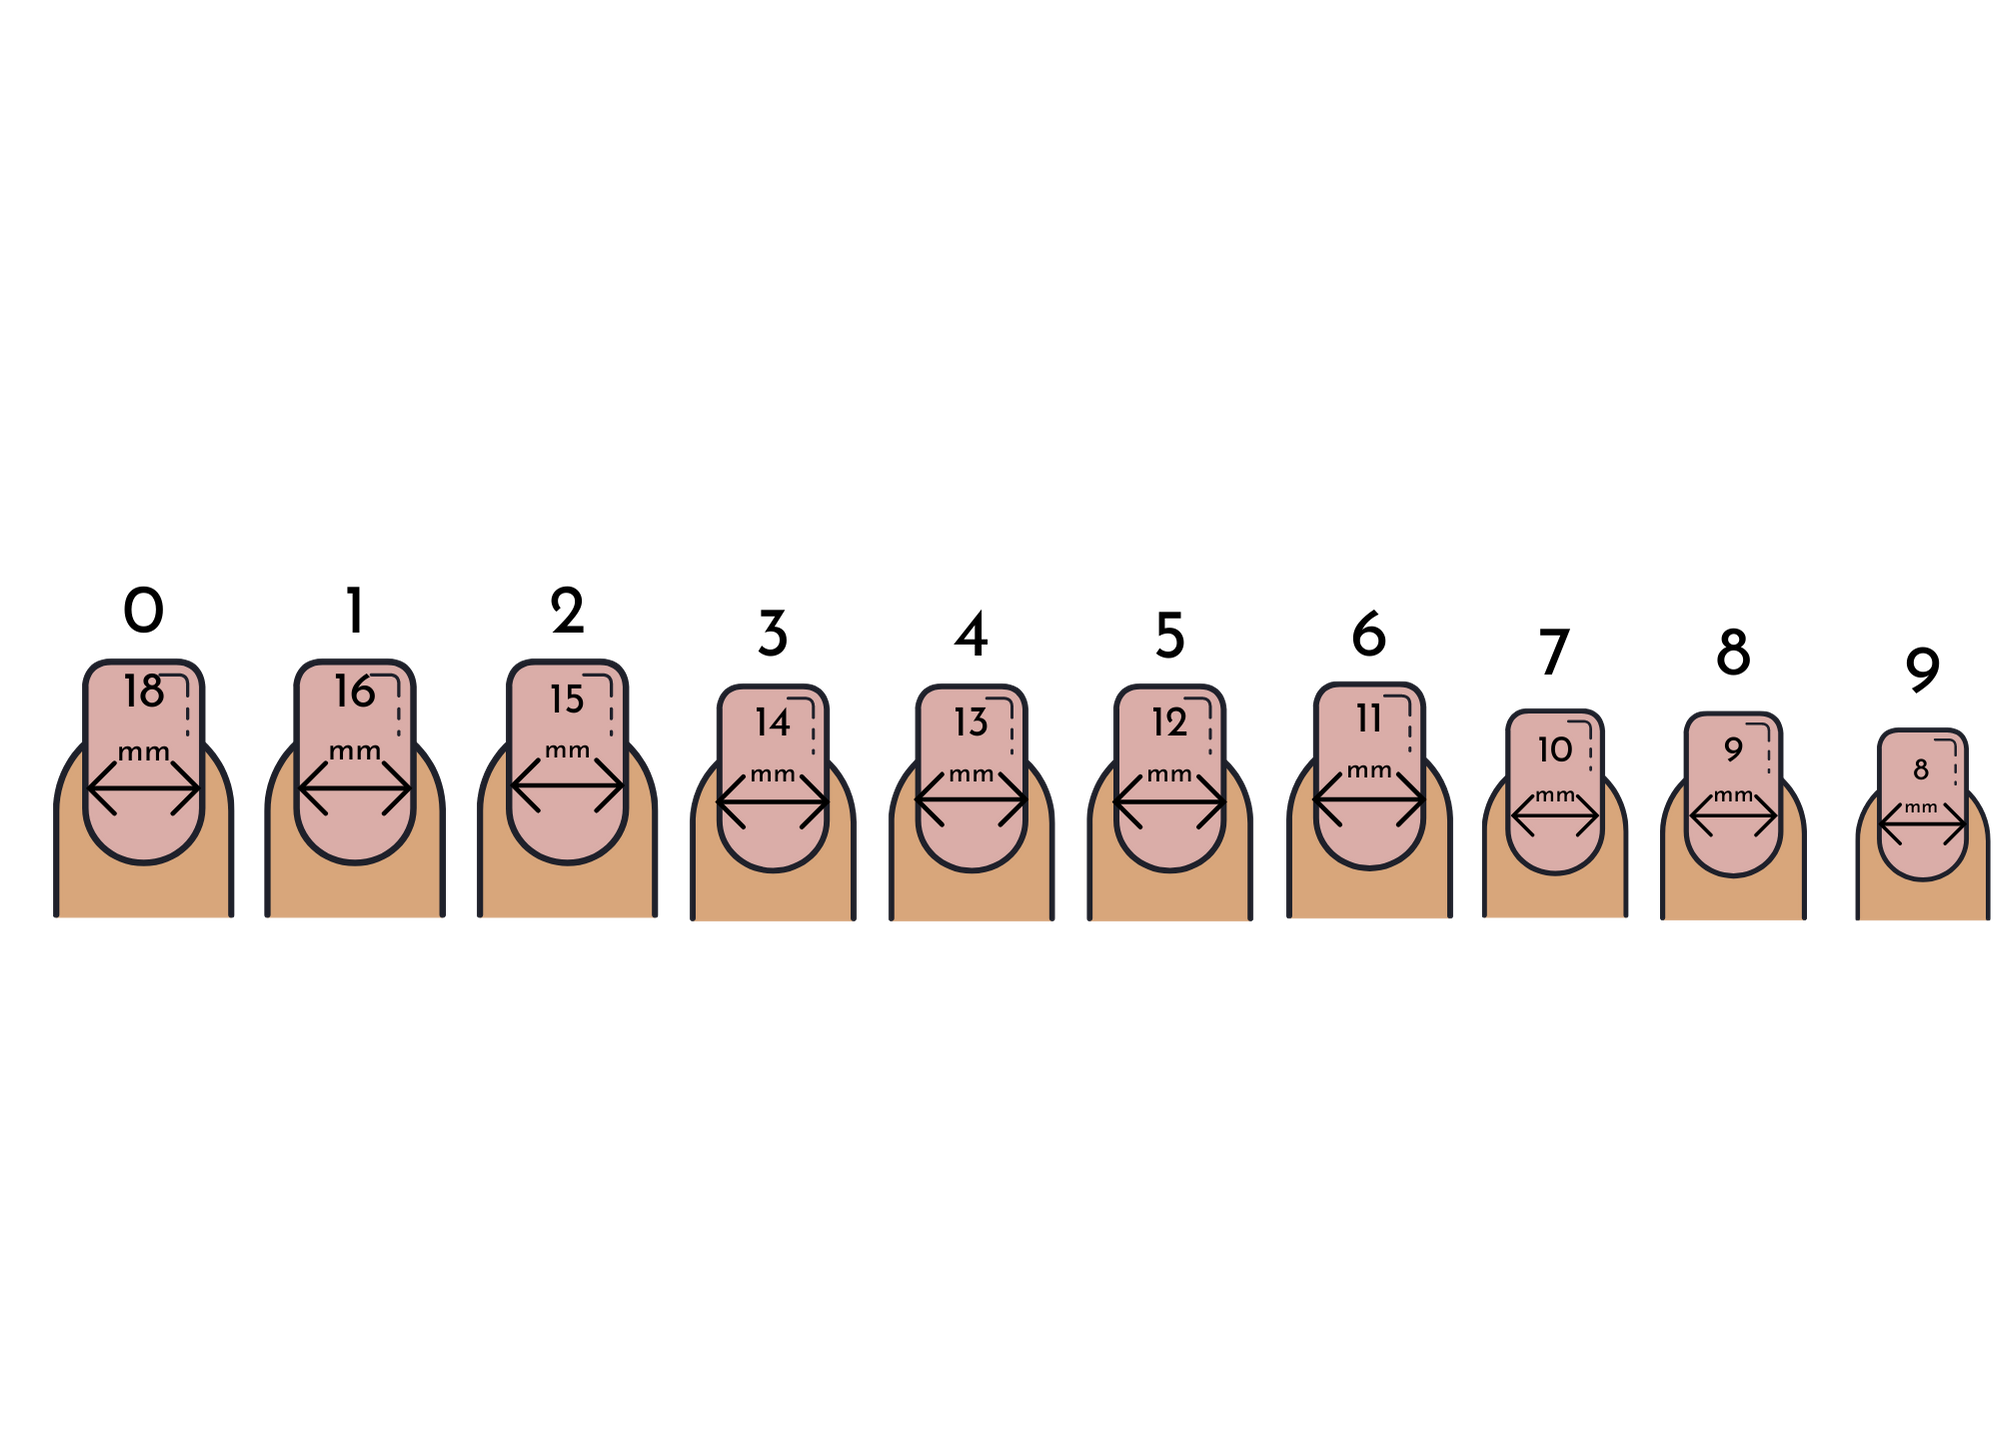
press on size chart
Pre-set Size Chart
(thumb to pinky)
XS= 3,6,5,7,9
S= 2,5,4,6,9
M=1,5,4,6,8
L= 0,4,3,5,7
Custom Size Chart
SIZE 0=18MM
SIZE 1=16MM
SIZE 2=15MM
SIZE 3=14MM
SIZE 4=13MM
SIZE 5=12MM
SIZE 6=11MM
SIZE 7=10MM
SIZE 8=9MM
SIZE 9=8MM
how to apply & remove your press on nails
Applying press on nails with nail glue:
1. Wash & dry hands in order to eliminate any oil on nail beds. Lay out your press ons:)
2. Push back cuticles with orange wood stick, & lightly buff nail beds with mini buffer; removing shine. TIP: your nail prep effects how long your press ons will last.
3. Wipe each nail bed with alcohol pad right before applying.
4. Apply nice even but small amount of glue, covering your nail bed. Align nail slightly under your cuticle & be sure to press down hard with thumb, hold for 30 secs & ensure you press on whole nail. And you're done!
applying press on nails with adhesive tabs:
1)Follow steps 1-3.
2) Flip press on & with tweezers(if you have) pick up tab & place it inside press on; do all 10 nails before applying. Hold down each press on for a few seconds & you're done!
check out my video tutorial!

how to remove glued press on nails:
1) Soak in warm soapy water for 15 minutes.
2) Then gently lift from side to side with orange wood stick. Do not rip off! If needed, soak longer.
3) Lightly buff off any left over glue on natural nail, with mini buffer.
how to remove press on nails with adhesive tabs:
1) Your press ons should lift very easily. If not, soak in warm soapy water for 5 minutes.
2) Use tweezers to pull tabs off. And if any residue left on nail, gently buff off with mini buffer.
check out my video tutorial!

press on nail tips for you!
Nails can be reused when removed carefully & properly.
It's not advised to remove nails before they are ready to come off; we want to avoid damage to the natural nail.
Choose the right length for your lifestyle, and be careful with your nails! They’re jewels, not tools;)
Do you still have questions?
Do you live in the city of Palma, & want me to size your nail beds for you?
Book a press on fitting appointment & you can choose your own colours & art too!
FOLLOW ME ON INSTAGRAM @MADEBY.AHYOKA